 |
|
|
|
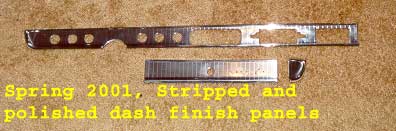
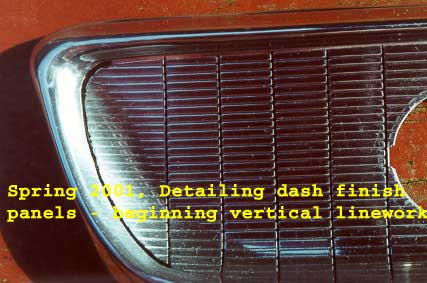
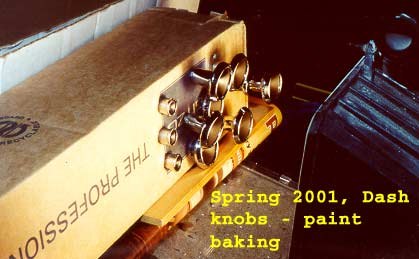
Aluminum Finish Panels. This is the good part. Many failed experiments went into this part restoration but ultimately excellent restorations of these panels were achieved. I had obtained an NOS replacement for the smallest of the panels that is located between the glovebox and dash end so this gave me an exact model for what the final result should appear like. If only the other two panels could be obtained NOS, then a lot of effort and expense could have been avoided. If you can find these panels NOS - buy them. Start with clean undamaged panels having no corrosion pitting or deep gouges. The coated aluminum panels have to be stripped and polished to begin the restoration process. These panels are originally mill coated aluminum sheet stock on the polished visible side only, not anodized, and can be stripped in minutes with paint remover followed by a rinse, followed by an acetone wiping. Polishing is routine except for having to be extremely careful not to launch the part with the buffing wheel, this is a hazard because of the many cutouts and holes. Polish only enough to remove the fine layer of surface oxidation, any more and the embossing is destroyed. You could stop here and install the panels and it would look beautiful for a while, even without the black lines, but soon the surface would oxidize. The difficult part of the restoration presents two problems. One - how to replace the protective clearcoat over the soft aluminum. Two - how to replace the fine black linework in the embossed area. What won't work to achieve a factory restoration appearance: Leaving the finish as is and trying to polish the coating surface (this doesn't repair the oxidized aluminum surface trapped underneath), anodizing (slightly too matte), any rattle can spray paint (loss of polish brilliance and poor adhesion and abrasion resistance), any conventional automotive clear coat finish (too thick and loss of polish brilliance), POR-15 Glisten PC (also too thick and just slight loss of polish brilliance). Apparently there occurs a chemical surface reaction when attempting to apply any finish to bare aluminum under room temperature and humidity conditions thus causing the aluminum to lose some of the highly polished brilliance. I used the professional services of Protective Coatings in Kent, WA to clearcoat the polished aluminum. Protective Coatings is a commercial services company that processes hundreds of aircraft parts daily but is willing to do small private jobs as well. They do not strip and polish the old part, they only apply finishes. I was shown examples of factory new aluminum wheels finished by clear anodize and also some by clearcoat. The clearcoated finishes they apply in a controlled dry hot atmosphere are the best available and tough enough to take abuse. This clearcoat application on the Galaxie aluminum finish panels is outstanding with no loss of the polished brilliance. Minimum small job cost is $100. The only drawback is that the coating surface is so hard that it resists any subsequent finish application, this makes applying the black lines difficult but not impossible. The black lines are redone with India ink applied with an artists Rapidograph inking pen and flexible drafting templates. This takes many hours of work and a very steady hand. The panels must be secured to the table during the inking process. I would estimate it took about 12 to 18 hours to ink all the black lines over about 6 work sessions. I used no. 0 (0.014 in.) and no. 1 (0.020 in.) size pen points. No. 0 pen points were used to ink in the embossed grooves and no. 1 was used for the outer perimeter. First I inked all the vertical lines then followed with the horizontals, working from bottom to top. The initial problem is that the ink will not permanently adhere to the hardened clearcoat surface. But this allows an advantage, for if a mistake is made the bad line work can be allowed to dry then gently rubbed off using a dry cotton swab or toothpick. After completing the inking of the black lines, a quartz halogen work light was used to bake small sections of the panels, one hour at a time, causing the black ink resins to melt into the clearcoat. No loss of the clearcoat brilliance or hardness occurred. A heating apparatus for powder coating would probably work just as well. I have several years experience using these ink pens on engineering drafting films and thus had some advantage and knowledge in their use. A local artist could be employed at this task, one who is familiar with inking techniques, and could probably do just as well or better. Do not attempt to fill the Rapidograph pen with any solvent based paints, such as enamel or lacquer, as these paints will melt and destroy the plastic parts of the pen. Except under a strong magnifying glass you cannot tell the difference between the factory line work and the restored lines. The end result looks exceptionally good compared alongside the one NOS panel obtained. The only close up, brightly illuminated, appearance differences are the result of mechanical polishing as opposed to the original sheet stock that was produced with polished and lubricated rollers at the mill. The original NOS panel has a uni-directional polish, whereas the mechanically polished surface can have a slightly variable appearance depending on the angle viewed from and brightness of ambient light. Finer polishing would reduce this difference but at the risk of destroying the embossed surface. |
|
Bezels. There are plastic bezels and die cast bezels. All bezels may have to be sent out for repair or purchased as reproductions. The round control knob bezels for lights, air, wiper and lighter are available from Dennis Carpenter - $100, and others. Beware of a possible defect in the lighter bezel - make sure it contains the same internal shape to support the lighter knob spring. I had to mold additional quick setting epoxy into mine to make it fit and assemble together properly. The instrument cluster contains five plastic bezels, including the two "dial knobs" centered on the fuel and temp lenses. I sent cores to Mr. G's in Fort Worth, TX and replated exchange replacements came back with a fresh coat of vacuum metalizing (plastic chrome). $55 for the lot of 5 parts. This vacuum metalizing is really a thin coat of aluminum and is sensitive to sunlight and abrasion. Some of the parts I was not happy with and sent them back for exchange. Mr. G's willingly exchanged the parts. But I had several cores and also tried the services of D & D Plastic Chrome Plating in Temperance, MI. $63 for the lot of 5 parts. Again I received what I call "mixed results" as some parts were made as good as new and others appeared rough and thinly plated. I used the best pick of the replated parts. This is a difficult job to do well apparently and perhaps some of the difficulty has to do with the condition of the base plastic material used in this model year. Some of my cores were a grayish colored base plastic and these plated very well, the "sand" colored ones did not. The metal die cast bezels are the heater, radio and clock. Unless you can find a set of die cast bezels that have been protected from moisture there will be some degree of pitting of the chrome plate that requires re-chroming for a nice restoration. I had the die cast bezels chrome plated by Art Brass Plating in Seattle, WA. $140 for the lot of 3 parts. They did an excellent job but were 3 months overdue from the promised date. To separate the heater bezel requires very careful drilling out of the attach rivets and thread tapping the holes for later re-assembly. |
|
Painting. I used PPG automotive paint products for most of the project. Some Eastwood rattle can spray paints were used including; Spray Gray, for coloring the steering gearbox and pittman arm, Silver Cad and Detail Gray for miscellaneous metal pieces and fasteners and Under Hood Black for the brake pedal arm. PPG DAU 75 was used as a protective clearcoat for many painted items. NAPA rattle can black vinyl spray was used on the original left side defrost duct hose that was faded but undamaged. Evercoat Feather Fill polyester primer surfacer was used on the steering wheel over the base material. Due to the Fall and Winter seasons, most all painting was done in the garage. A cartridge type, 3M face mask respirator was worn. A 6,000 watt, 250 volt heater was installed to warm the work area when required. Some difficulty was encountered with a couple of parts that had been contaminated with silicone. Even after stripping to bare metal some silicone was still present in the metal grain and caused "fish-eyes" in the paint, expensive fish-eye paint additives did not help much. Heating the part up and spraying very thin tack coats of epoxy primer to seal the surface took care of the fish-eye problem. Spray guns and compressed air are a must, unless you wish to send many parts out for painting, but then you don't have the control to make the finish turn out just so. I used a Binks Model 7 gun with a 1 quart cup and DeVilbiss EGA 502 detail gun. The Binks does a nicer finish but is for full scale automotive painting and flows a lot more paint. Spray applications of primer to large numbers of bare metal parts was accomplished outdoors in the early Autumn with the Binks. Applications of color and clearcoat finishes were usually done with the smaller DeVilbiss. An airbrush would be handy for small refinishing work such as the control knobs and also heater, radio and clock bezel faces. Addresses. Just some of the companies that parts or services were purchased from: |
| Around The Sound Loudspeaker Reconing
323 N 105th St C Seattle WA 98133 206-782-7975 |
Greg Donahue Collector Car Restorations
12900 S Betty Pt Floral City FL 34436 352-344-4329 |
| Art Brass Plating
5516 3rd Ave S Seattle WA 98108 206-767-4443 |
Just Dashes
5941 Lemona Avenue Van Nuys CA 91411 818-780-9005 |
| Dennis Carpenter Reproductions
PO Box 26398 Charlotte NC 28221 1-800-476-9653 |
Mr. G's Rechromed Plastic
5613 Elliot Reeder Road Ft Worth TX 76117 817-831-3501 |
| D & D Plastic Chrome Plating
7310 Lewis Ave PO Box 364 Temperance MI 48182 419-260-2723 |
Protective Coatings
1215 2nd Ave N Kent WA 98032 253-854-9330 |
| The Eastwood Company
263 Shoemaker Rd Pottstown PA 19464 1-800-345-1178 |
 |
 |