
Subject: C6 Transmission Linkage Modifications
by Ted McMurray
From the Dock of Dad's Boat...
Most C6’s will come from column-shift cars. When put into column shift cars, usually only the length of the shift rod is altered. Simple enough. When you put a column -shift transmission in a floor shift car you will find the linkage on the transmission is reversed. If the column shifter pulls the linkage forward for “park” the floor shifter will push it into “low” gear while displaying “park” on the console. The correct way to remedy this problem is either get a C6 from a floor shift car or a column shift car (which ever you need). You could have the shift lever in the C6 changed from one to the other by a transmission person...or there’s always “my way”...
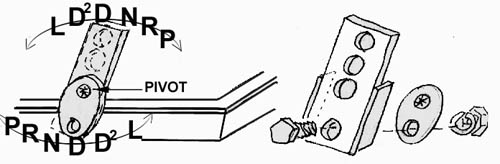 |
Adding a small piece of metal approximately 3 inches long with several holes drilled in it to the existing transmission linkage will reverse the pattern.
Because you drilled multiple holes in the add on piece, you can now move your shift rod up and down to change the length of the throw. You can put one bolt through the metal add on you made and the hole of your shift lever would go into on the transmission linkage and from there you can weld or add another bolt or put shoulders on the shaft you make to lock it tight to the transmission shift shaft. (see picture)
It’s not really difficult, but it does take a little thought. You may still have to lengthen your shift linkage rod that fits into the shifter and transmission. Go for it...you can do it!
From the Dock of Dad's Boat...
Have you ever had a need to shorten a driveshaft? Very seldom do we get into a situation where we need a longer one. Heres the way I do it. First, measure the distance from the end of the transmission output shaft to the pinion trunion cap mount. (see figure 1)
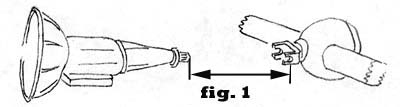 |
Then add about 3/4 of the length of the slip yoke that slides into the transmission. This will be the length of the shaft allowing for movement of the rear end and the shaft to slide in and out on the transmission output shaft. It is easiest if you can cut the rear of the shaft. You will get less vibration than if you cut the front of the shaft. It does not take a brain surgeon to do this...just a little guts. The worst that could happen is that it would cost you $20.00 for another shaft. On the other hand, the satisfaction you get from doing it is well worth the effort. OK...we are ready to start.
Take your shaft and measure like you were shown above, from the end of the slip yoke, across the u-joint, down the shaft and mark it at whatever measurement you came up with. Most shafts are shortened 4 to 6 inches. At the rear of the shaft you will see where the factory manufacturer has welded the tube to the rear u-joint support. I use an old style ring compressor band about 6 inches long, placing it around the shaft at the line you marked on the shaft. By tightening the band you can tell if it is true around the shaft. Once you get it true, use a hacksaw and cut around the compressor. Don't cut completely through in one cut. Cut around and keep turning the shaft unit it is cut off. Remove the compressor and you should have a true cut.
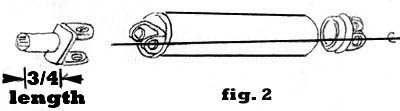
Take the end you cut off and saw around just in front of the factory weld in the same manner as before. By now you know the shaft is only one-eighth inch thick. Just saw through the shaft and not through the cast iron u-joint support. Once you have cut all the way around and through the shaft tube one eighth inch, hit the end with a hammer knocking the end off the tube. At this point you should have three pieces. The front, the middle and the casting. At this point you can do a couple of things. You can grind the weld and the small amount of tube off the casting. (I clean it off with a cutting torch and then grind it) This is not necessary but it will give you another quarter inch for the casting to fit into the tube. If you don't grind off the weld, you can still use the casting. Notice the location of the u-joint support at the other end of the shaft and match the rear casting to the front casting. (see figure 2)
 |
After you line up the casting, drive the rear casting into the shaft you cut. Now comes the tricky part. Put your drive shaft in a vice, on a block, or anywhere it can be supported. Preferably waist high. You will understand in a minute. I use two welding rods. You can use two pencils or anything straight. Lay one welding rod across the u-joint support casting on each end and sight down the shaft from the end. Tap the casting you put in up or down to line up the welding rods.(see figure 3)
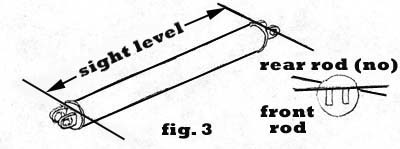 |
When you have the rods in line, measure both sides to length by tapping the casting in or out, then have it welded. If, by chance, you have to remove the balance weights with the piece you cut out-its ok. Try the new shaft - it should be nearly vibration free. There are some techniques for balancing. These will be discussed in an upcoming lesson.
Good luck!
Ted Mc Murray,
owner-Dad's Boat
(Ted McMurray is a retired Master Mechanic who loves to write about the experiences that he has had. I look forward to his writings. If you have writing and instructional skills, please consider sharing them with the club via the magazine. As the magazine and club size grows we will be needing more regular contributors. Thanks Ted for a fine article on driveshaft shortening. ED)(This article was in the Volume 14 issue 4 July/August edition of the Galaxie Gazette
This in from John Salerno:

Click here for CONTACT INFORMATION
Send 
Brief Disclaimer